Learn how to automate your vSphere infrastructure.

Month: September 2023

NQN – NVMe Qualified Name

The NQN is what enables the NVMe layer to communicate to the correct endpoints on the FC fabric.

In order to find the NVMe Qualified Name for each physical ESXi host in the vCenter, connect to the vCenter, and then run the following command:

Get-VMHost | select Name,@{n='NQN';e={(Get-EsxCli -V2 -VMHost $_.Name).nvme.info.get.Invoke().HostNQN}}
0
0

Read WWNN and WWPN from a VMHost

WWNN (World Wide Node Name) and WWPN (World Wide Port Name) are unique identifiers used in Fibre Channel and Fibre Channel over Ethernet (FCoE) storage networks.

One can read them on the UI for sure, but reading using a script will help to perform some automation tasks.

The process of reading it is explained below:

  • Connect to your vCenter(s). You can use the PowerCLI directly, but using a wrapper will help you connect and work with multiple vCenters. This wrapper is called Connect-vCenter
  • Get all VMHosts that are in Connected or Maintenance state.
$VMHosts = Get-VMHost -State Connected,Maintenance
  • Going for each VMhost and reading the VMHostHba
# Empty array to store the infromation
$AllVMHostHBAInfo = @()

# Loop for each object
foreach($VMHost in $VMhosts){
    # For each host get collect the information and store it to the variable $VMHostHBAs
    # like Device, Status, Driver, Model
    # also convert WWPN and WWNN decimal format to a more readable value
    $VMHostHBAs = $VMHost | Get-VMHostHba -Type FibreChannel | Select-Object Device, Status, Driver, Model, @{n='WWPN';e={$wwpn = "{0:x}" -f $_.PortWorldWideName; (0..7 | ForEach-Object {$wwpn.Substring($_*2,2)})}}, @{n='WWNN';e={$wwnn = "{0:x}" -f $_.PortWorldWideName; (0..7 | ForEach-Object {$wwnn.Substring($_*2,2)})}}

    # Foreach Hba for that host
    foreach($VMHostHBA in $VMHostHBAs){
        # Create a hash-table and store the information
        # foreach host, and then for each Hba in that host
        # I used [ordered] - as I want the infromation below to be in this order when it is generated
        $props = [ordered]@{}
        $props.'vCenter' = $VMHost.vCenter
        $props.'Cluster' = $VMHost.Parent.Name
        $props.'VMHost' = $VMHost.Name
        $props.'Device' = $VMHostHBA.Device
        $props.'Status' = $VMHostHBA.Status
        $props.'Driver' = $VMHostHBA.Driver
        $props.'Model' = $VMHostHBA.Model
        $props.'WWPN' = $VMHostHBA.WWPN
        $props.'WWNN' = $VMHostHBA.WWNN

        # Collect and store the inforamtion in to the Emtpy array that was created above
        $AllVMHostHBAInfo += New-Object -TypeName PSCustomObject -Property $Props
    }
}

The result will look like this. Of course the data in the picture below is obfuscated.

The real data that will be generated on your environment will be used on scripts to perform other tasks, or as reporting.

Last but not least, you can create a function which can be used by anyone in your team. Add this function your PS module. It is going to look like this:

The function:

function Read-HBAFCWWPNandWWNNInfo {
    param($VMHost)

    # Connect on all vCenters
    Connect-vCenter

    # Empty array to store the infromation
    $AllVMHostHBAInfo = @()

    # Loop for each object
    foreach($VMHost in $VMhosts){
        # For each host get collect the information and store it to the variable $VMHostHBAs
        # like Device, Status, Driver, Model
        # also convert WWPN and WWNN decimal format to a more readable value
        $VMHostHBAs = $VMHost | Get-VMHostHba -Type FibreChannel | Select-Object Device, Status, Driver, Model, @{n='WWPN';e={$wwpn = "{0:x}" -f $_.PortWorldWideName; (0..7 | ForEach-Object {$wwpn.Substring($_*2,2)})}}, @{n='WWNN';e={$wwnn = "{0:x}" -f $_.PortWorldWideName; (0..7 | ForEach-Object {$wwnn.Substring($_*2,2)})}}

        # Foreach Hba for that host
        foreach($VMHostHBA in $VMHostHBAs){
            # Create a hash-table and store the information
            # foreach host, and then for each Hba in that host
            # I used [ordered] - as I want the infromation below to be in this order when it is generated
            $props = [ordered]@{}
            $props.'vCenter' = $VMHost.vCenter
            $props.'Cluster' = $VMHost.Parent.Name
            $props.'VMHost' = $VMHost.Name
            $props.'Device' = $VMHostHBA.Device
            $props.'Status' = $VMHostHBA.Status
            $props.'Driver' = $VMHostHBA.Driver
            $props.'Model' = $VMHostHBA.Model
            $props.'WWPN' = $VMHostHBA.WWPN
            $props.'WWNN' = $VMHostHBA.WWNN

            # Collect and store the inforamtion in to the Emtpy array that was created above
            $AllVMHostHBAInfo += New-Object -TypeName PSCustomObject -Property $Props
        }
    }
    return $AllVMHostHBAInfo
}
0
0

Create Calculated Properties

ViProperties in PowerCLI refer to the object properties retrieved for example, using the Get-VM cmdlet. These properties include essential information about virtual machines in VMware environments, such as their names, power state, hardware configuration, and more. ViProperties serve as the foundation for managing and automating virtual machine tasks in PowerCLI, allowing administrators to gather critical data and make informed decisions about their VMware infrastructure.

Find the vCenter where the object (VM, VMHost, Datastore, VMHost, Cluster) is stored to.

New-VIProperty -Name vCenter -ObjectType VirtualMachine -Value {
    param($obj)
    return (($obj.uid -split ":")[0] -split "@")[1]
} -Force | Out-Null

New-VIProperty -Name vCenter -ObjectType VMHost -Value {
    param($obj)
    return (($obj.uid -split ":")[0] -split "@")[1]
} -Force | Out-Null

New-VIProperty -Name vCenter -ObjectType Cluster -Value {
    param($obj)
    return (($obj.uid -split ":")[0] -split "@")[1]
} -Force | Out-Null

New-VIProperty -Name vCenter -ObjectType Datastore -Value {
    param($obj)
    return (($obj.uid -split ":")[0] -split "@")[1]
} -Force | Out-Null

After they’re created, then someone may use them as mentioned in the example below:

Get-VM | Select Name, vCenter
Get-VMHost | Select Name, vCenter

These custom VI Properties can be packed into a function, that can be used whenever you connect to vCenter, otherwise you don’t need them.

Packing into a function is easy, the code can be found below:

function Create-VIProperties {
    New-VIProperty -Name vCenter -ObjectType VirtualMachine -Value {
        param($obj)
        return (($obj.uid -split ":")[0] -split "@")[1]
    } -Force | Out-Null

    New-VIProperty -Name vCenter -ObjectType VMHost -Value {
        param($obj)
        return (($obj.uid -split ":")[0] -split "@")[1]
    } -Force | Out-Null

    New-VIProperty -Name vCenter -ObjectType Cluster -Value {
        param($obj)
        return (($obj.uid -split ":")[0] -split "@")[1]
    } -Force | Out-Null

    New-VIProperty -Name vCenter -ObjectType Datastore -Value {
        param($obj)
        return (($obj.uid -split ":")[0] -split "@")[1]
    } -Force | Out-Null
}

Not only you can put this function to the PS Module but it can be put within the Connect-vCenter function so that whenever you call the function the necessary VI Properties will be created.

0
0

Create your own Aliases


Aliases in PowerCLI are shortcuts or alternative names for PowerShell cmdlets and functions. They provide a convenient way to execute common commands with shorter and more intuitive names. Aliases make PowerCLI scripting faster and more user-friendly by reducing the need for typing lengthy cmdlet names. While they enhance productivity, it’s important to use them judiciously and consider readability when sharing scripts with others, as excessive use of aliases can make code less clear and maintainable.

Aliases that I use on my daily work are:

  • Create an alias called count for the Measure-Object cmdlet. Instead of accessing the .count property, you can pipe your command to the count alias
0
0

Creating your PS profile

PowerShell profiles might sound like a tech insider’s secret, but they’re a valuable tool for anyone who uses PowerShell regularly. In this brief blog, we’ll uncover why PowerShell profiles are important and what you can achieve with them.

What are PowerShell Profiles?

A PowerShell profile is a script that runs when you start a PowerShell session. Think of it as your personalized setup for PowerShell. It allows you to define custom configurations, functions, and aliases that streamline your PowerShell experience.

Why are They Important?

  1. Customization: With a PowerShell profile, you can tailor your environment to your needs. Create custom aliases for frequently used commands, load specific modules automatically, or define your prompt to display essential information.
  2. Automation: PowerShell profiles enable you to automate tasks you frequently perform. You can load modules, connect to servers, or set environment variables automatically upon starting a session, saving time and effort.
  3. Consistency: Profiles ensure a consistent experience across sessions and machines. Your customizations and configurations follow you wherever you use PowerShell.

In essence, PowerShell profiles empower you to make PowerShell your own. They transform it from a powerful command-line tool into a personalized, efficient, and consistent environment. Don’t miss out on the advantages – start crafting your PowerShell profile today to unlock your full PowerShell potential!

Some important things that you can include into profiles are:

  • VIProperties – which will help you to read information which deep into the API objects
  • Aliases – create aliases that help you to be more productive.
  • Custom functions that belong only to you.

PowerShell supports several profile files that are scoped to users and PowerShell hosts. You can have any or all these profiles on your computer.

For example, the PowerShell console supports the following basic profile files. The profiles are listed in order that they’re executed. More info.

  • All Users, All Hosts – $PSHOME\Profile.ps1
  • All Users, Current Host – $PSHOME\Microsoft.PowerShell_profile.ps1
  • Current User, All Hosts – $HOME\Documents\WindowsPowerShell\Profile.ps1
  • Current user, Current Host – $HOME\Documents\WindowsPowerShell\Microsoft.PowerShell_profile.ps1

Whatever you put into this file “$HOME\Documents\WindowsPowerShell\Profile.ps1” it will be loaded for all hosts (PS and ISE) for the current user.

0
0

PowerCli configuration

Configuring PowerCLI settings using the Set-PowerCLIConfiguration cmdlet is a straightforward process that can greatly enhance your PowerCLI experience. It has different options which can be read by reading the help of it. However, two most important in my point of view are DefaultVIServerMode and Scope.

  • DefaultVIServerMode: Specifies the server connection mode. The new configuration takes effect immediately after you run the cmdlet. The following values are valid: Single, Multiple.
    • Single – If no target servers are specified, cmdlets run only on the last connected server.
    • Multiple – If no target servers are specified, cmdlets run on the servers in the variable.
  • Scope: Specifies the scope of the setting that you want to modify. The parameter accepts Session, User and All Users values.
    • Session – the setting is valid for the current VMware PowerCLI session only and overrides any User and All Users settings.
    • User – the setting is valid for the current Windows user only, overrides All Users settings, and is applied only if a Session setting cannot be detected.
    • All Users – the setting is valid for all users and is applied only if Session and User settings cannot be detected.

With the DefaultVIServerMode one should be careful as you may be connected to multiple vCenters on different environments (Test, or Prod) and think that you’re connected only to one server and run something which could affect Production as well. If someone know what he/she is doing or if he/she writes scripts which point exactly to a vCenter by utilizing -Server parameter of each cmdlet, then Multiple value would make more sense as it is easier to work with multiple environments.

This information can be read using Get-PowerCLIConfiguration cmdlet.

0
0

Simplifying Multi-vCenter Management: Building Your Own Wrapper

As organizations expand their virtual infrastructure, managing multiple vCenter servers becomes a common scenario. VMware’s vCenter Server provides a centralized platform for managing virtualized environments, but handling numerous vCenter servers can be overwhelming. Instead of repeatedly executing the “Connect-VIServer” command for each server, you can streamline the process by creating your own wrapper script. In this blog, we’ll explore why dealing with multiple vCenters is crucial and how building a wrapper script can simplify your management tasks.

Why Manage Multiple vCenters?

Large enterprises and service providers often operate multiple vCenter servers for various reasons, such as:

  1. Geographical Distribution: Organizations with data centers in different locations may require separate vCenters for each region to ensure low-latency access and efficient management.
  2. Isolation and Security: Segregating vCenter servers can enhance security by isolating sensitive workloads or customer environments.
  3. Resource Management: Large-scale environments with thousands of VMs may benefit from dividing resources into multiple vCenter instances for better performance and scalability.

The Challenge: Connecting to Multiple vCenters

When dealing with multiple vCenters, a common challenge is connecting to each server individually using the “Connect-VIServer” command. Executing this command every time you need to manage a different vCenter can be time-consuming and cumbersome, especially if you have a complex infrastructure with many servers.

The Solution: Building Your Own Wrapper

To simplify the management of multiple vCenters, you can create your own wrapper script in PowerShell. This script automates the connection process, allowing you to manage multiple vCenters seamlessly. Here’s how you can build one:

  • Set Up Configuration

Create a configuration file or PowerShell script that contains details about your vCenter servers, such as their names, IP addresses. Storing this information on a central location is crucial. Whenever, new vCenters come into play, you have to update the configuration file where it will be used by the wrapper.

There are different ways to store the information centraly.

  1. Shared Folder – Create a shared folder somewhere where your laptop or jump host has access to.
  2. Version Control System – deploy it locally on your network, for example Gitea.
  • Build the Wrapper Script

Below is an example on how to write a wrapper.

Create a function:

function Connect-vCenter {

}

Define the list of vCenters:

$ListOfvCenters = 'vcenter1.yourdomain.local','vcenter2.yourdomain.local'

Ask for credentials:

$vCenterCredentials = Get-Credential -Message "Provide your vCenter credential"

Connect to all vCenters:

Connect-VIServer -Server $ListOfvCenters -Credential $vCenterCredenials

Combine everything into a usable function

function Connect-vCenter {
    # Define your vCenters
    $ListOfvCenters = 'vcenter1.yourdomain.local','vcenter2.yourdomain.local'

    # Request your vCenter credential
    $vCenterCredentials = Get-Credential -Message "Provide your vCenter credential"

    # Connect to your vCenters
    Connect-VIServer -Server $ListOfvCenters -Credential $vCenterCredenials
}
  • Execute the Wrapper Script

The function can be imported into your actual opened console by dot sourcing it. That can be done by placing a . (dot) in front of the full path. For example:

. "C:\Users\Administrator\Documents\Connect-vCenter.ps1" 

Then you can call the function Connect-vCenter

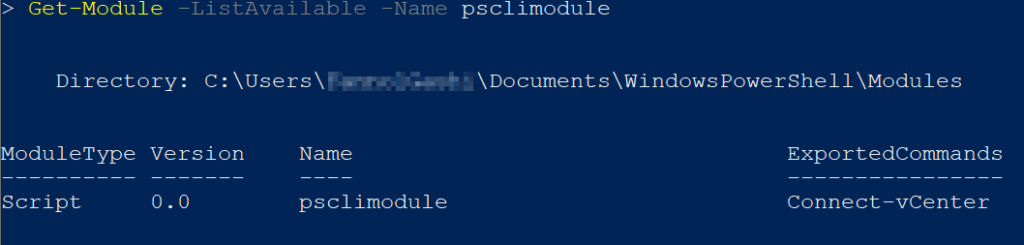
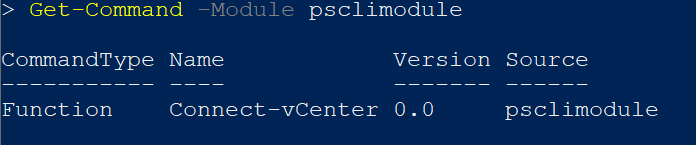
Otherwise, you can create a PS Module and place your functions there. A PowerShell module is like an army Swiss knife for your computer. Just as a Swiss knife packs multiple tools into one handy device, a PowerShell module bundles various commands and functions into a single, cohesive package. More info can be found here: Create a PowerShell Module

Besides that, the function for creating VI Properties can be added into the Connect-vCenter function. So, whenever you connect to the vCenters, the VI properties will be created

function Connect-vCenter {
    # Define your vCenters
    $ListOfvCenters = 'vcenter1.yourdomain.local','vcenter2.yourdomain.local'

    # Request your vCenter credential
    $vCenterCredentials = Get-Credential -Message "Provide your vCenter credential"

    # Connect to your vCenters
    Connect-VIServer -Server $ListOfvCenters -Credential $vCenterCredenials

    # Create the necessary VI Properties
    Create-VIProperties
}
0
0

Create a PowerShell Module


A PowerShell module is like an army Swiss knife for your computer. Just as a Swiss knife packs multiple tools into one handy device, a PowerShell module bundles various commands and functions into a single, cohesive package.

Creating your own PowerShell module is beneficial because it:

  1. Organizes code into reusable components.
  2. Prevents naming conflicts.
  3. Facilitates collaboration and documentation.
  4. Supports versioning and testing.
  5. Enables sharing with the community.

Creating a PS Module is a straight forward process. The locations where you can place your PS module can be found by executing this command:

(ls env:\PSModulePath).Value -split ";"

Within one of those folders, you have to create a folder with the name of the Module and inside create a psm1 file with the same name as the module. The path should look like this: C:\Users\<yourUser>\Documents\WindowsPowerShell\Modules\<moduleName>\<moduleName>.psm1

e.g. When the module is called psclimodule:

C:\Users\Admin\Documents\WindowsPowerShell\Modules\psclimodule\psclimodule.psm1 

The functions you create can be stored within that file, and then they are imported automatically when you call a function from that module.

0
0

Deploy Gitea on your server

Gitea is an open-source, web-based platform designed for hosting and managing Git repositories. It serves as a lightweight and self-hosted alternative to popular Git repository hosting services like GitHub and GitLab.

Deploying it is an easy process. However, you have to maintain it by installing updates and backing it up.

  1. Download the latest windows version from here. Gitea Download Page For example: gitea-1.20.4-windows-4.0-386.exe
  2. Create a folder under Program Files and place the already downloaded file in that folder, and rename the file to gitea.exe so when you change versions you don’t need to re-create the service again.
  3. Create a Windows service and start it, so that Gitea will start together with windows.
New-Service -Name "Gitea" -BinaryPathName "C:\Program Files\gitea\gitea.exe" -StartupType "Automatic" -Description "Gitea"

Gitea then can be accessed via your browser from the network. http://fqdn:3000 or http://ip:3000

1
0

Installing PowerCli

PowerCLI, developed by VMware, is a command-line interface (CLI) tool that allows administrators and developers to manage and automate various tasks in VMware environments. It provides a powerful set of cmdlets for managing virtual infrastructure, making it an essential tool for anyone working with VMware technologies.

In this article, we will explore one method of installing PowerCLI to help you get started with managing your VMware infrastructure efficiently.


Installing PowerCLI via PowerShell Gallery

One of the most straightforward ways to install PowerCLI is by utilizing PowerShell’s built-in package management features and the PowerShell Gallery. Here’s how you can do it:

  1. Open a PowerShell terminal with administrative privileges.
  2. Run the following command:
Install-Module -Name VMware.PowerCLI

After the installation is completed, it can be verified by looking at which modules are installed by executing the following command:

Get-Module -ListAvailable -Name VMware*
1
0

© 2024 PowerCli scripting

Theme by Anders NorenUp ↑